Monday, December 28, 2015

Carlin


Carlin
               A longitudinal deck framing member (i.e., one that runs fore and aft).


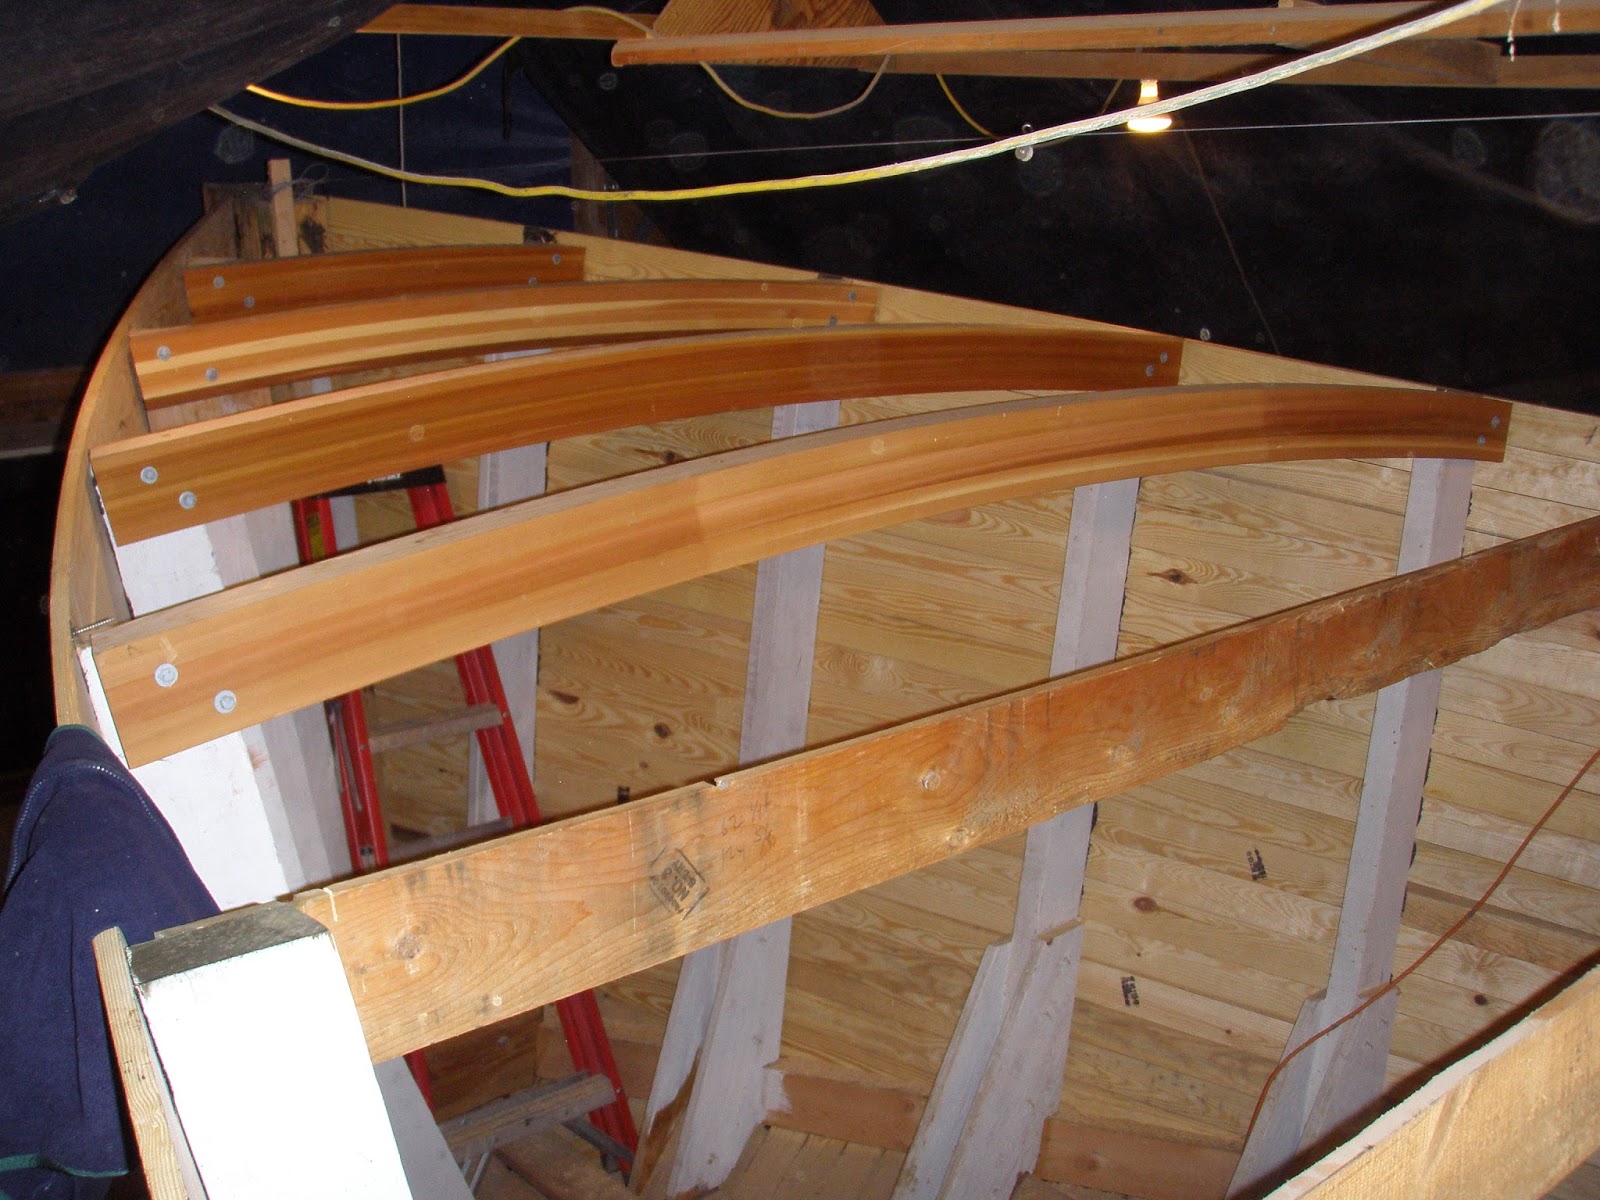
This picture shows the notching of the deck beam at station # 8. The sloping notch is 3" wide and will receive a 3" carlin which will be 2- by's laminated together and run from station # 8 back to the bulkhead at stateroom.  The sloping notch is cut into the deck beam deeper at the top of the deck beam, maybe 3/4" and almost flush at the bottom of the deck beam, thus keeping the carlin from sliding down and the carlin top remains flush with the deck beam.


The carlin ( the 2 by to the left in the picture below) is above the sheer height thus giving
the gunwale short deck beams a slope or a crown. The gunwale short deck beams are also notched into the first carlin layer with a sloping notch. Each beam is then  bolted to the frame and are all the same length giving the carlin the curved shape of the sheer.


Once all the gunwale short deck beams are in place the second layer of the carlin is glued and nailed.

And finally the carlin is in and assumes the shape of the boat. The gunwale deck beams can be planned to make a crown and the carlin will need to be beveled to match the crown of the beams. Once in place the carlins and the deck beams provide a strong gunwale. Knees can be put in under these deck beams attaching to the frames. I did not feel that they were necessary.


Monday, December 14, 2015

Deck Beams Install


After the planking and the aft deck beams are installed as well as the forward deck beams, it's time to install the two bulkheads. This bulkhead separates the engine room from the Stateroom. The second bulkhead divides the engine room from the galley.


Deck Beams


Now with the top sheer plank off I was able to place the deck beams on the second planking layer and fit the deck beams to the frame. I left a space between the planking and the en of the deck beam. In a wooden boat you want air to circulate.


                                      Bolted each deck beam to the frame and the hull was taking shape.


Forward deck beams.  The Carlin's will attach to the last deck beam shown in this photo, 
or at station 8. We will see this later.


These beams have come a long way since the start of the project. I get more positive comments on the deck beams from visitors than any other part of the boat. That Tung Oil is great!

Planking


 The front planking was two layers of 1" cut in wedge shapes and with directional changes. This was due to the curvature of this area, as seen in the side photo

 Inside view of the planking on the frames starboard side.


Starboard side

Ah! At last, Planking

Planking: This is one of the real fun parts of the building process!  I planked the bottom with
2" by 6" Doug-fir. Layer of tar on all frames and stringers. Nailed and screwed.


Side planking was 1" by 4" Southern Yellow Pine clamped, nailed and screwed over the frames with a layer of tar between the planking and the frames.

             Second row of planking put on first leaving the first row at the sheer off to make it easier to                                                      install deck beams in the future.


Make the planking tight

Moves along once the sheer plan is established 


Used short and long pipe clamps to keep the planking tight.
As you can see I worked from top to bottom
Starting to take shape

Thursday, September 17, 2015

Notching. Oh no the chine!!!!

Now for the notching of the frames for the stringers and the chine. 
 The frames were notched 1.5" deep by 3.5" wide to receive a DF 2x4 stringer from stem to stern and from the keel to the chine on about 18" on center. This I did by putting multiple blades on a skill saw and cutting back and forth till the notch was made. After the notching was completed I placed tar in the notch and clamped on long 2x4's and nailed and screwed the in place.  Lot of work over head but with the sand and sawdust floor it was easy on the knees.
 Now to the Chine. As you see the frames were notched for the chine on the frame table. THIS IS A HUGE MISTAKE IN MY OPINION. I found that most of the pre-cut notches were not even close and had to be re-cut. They also made the laying out of the chine more difficult.  I wasted a lot of time using this method. if I was to do this again I would not cut the notches in the frames till they were in place. Then run a batten around the boat where the chine is to be cut in. Mark it and cut the notches then. Much easier!!!

Sunday, January 25, 2015

Just Some Frame Pictures

Starboard Frames


Port Frames


Looking from fore to aft. The front two frames at station #2 and #4 will be made in place to fit once the stem is set and some of the planking is in place.

When the frames go up the boat starts to take a shape. Looking at her after they are up, you really start to think your making a boat and not just cutting and shaping wood.

First Frame


First frame up!!!  Denise was on her way to the beach and was kind enough to pose for this memorable event.

One Man Operation


Once the frames were put together on the frame table with temporary cross bracing and a temporary top chord it was time to put the frames up. I had left the floor timbers long to be cut off flush with the frames later. This made it easy for me to raise and attach the frames without help. Once the frames were up they would slide down over the keel to top of the rabbit. I would clamp the to the floors in place.

Finished Deck Beams

Finished deck beams


Once all the beams were completed I ran them through the planer on both sides. Sanded the underneath of the beam and rounded the edge slightly. I put trunnels every 10 inches by drilling  3/8" holes from the top down through the layers to mid-point of the lower layer. I then drove a 3/8" dowel with glue into the hole for extra strength. The final touch was to coat the beams with a coat or two of Tung Oil.